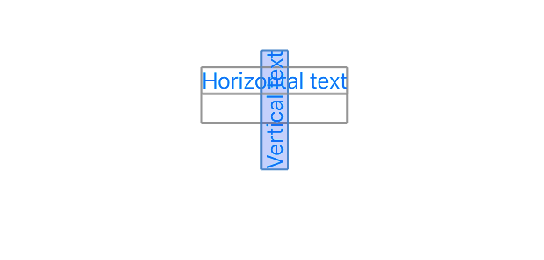
struct RotatedTextTestView: View {

    var body: some View {
        VStack() {
            Text("Horizontal text")
            Text("Vertical text").rotationEffect(.degrees(-90))
        }
    }
}
SwiftUI에서 Text를 회전(rotationEffect)하면 원래 배치된 위치 기준으로 회전되므로,
👉 VStack 내부에서 회전한 크기를 반영하지 않고 배치되는 문제가 발생할 수 있다.
👉 이를 해결하기 위해 PreferenceKey를 사용하여 뷰의 크기를 측정하고, 회전 후의 올바른 위치를 계산해야 한다.

✅ Text 회전 후 올바르게 정렬하는 방법
1️⃣ PreferenceKey를 사용하여 뷰의 크기 측정
뷰의 크기를 측정하기 위해 SizeKey라는 PreferenceKey를 만든다.
private struct SizeKey: PreferenceKey {
    static let defaultValue: CGSize = .zero
    static func reduce(value: inout CGSize, nextValue: () -> CGSize) {
        value = nextValue()
    }
}
이 PreferenceKey를 사용하면, 특정 뷰의 크기를 onPreferenceChange를 통해 동적으로 추적할 수 있다.
2️⃣ View 확장(extension)으로 크기 측정 함수 추가
captureSize(in:)를 활용하여 뷰의 크기를 Binding<CGSize>에 저장할 수 있도록 만든다.
extension View {
    func captureSize(in binding: Binding<CGSize>) -> some View {
        overlay(GeometryReader { proxy in
            Color.clear.preference(key: SizeKey.self, value: proxy.size)
        })
        .onPreferenceChange(SizeKey.self) { size in binding.wrappedValue = size }
    }
}
✅ 이제 View에서 .captureSize(in: $size)를 사용하여 크기를 저장할 수 있다.
3️⃣ 회전된 뷰를 자동으로 크기 조정하도록 수정
rotationEffect를 사용하면 원래 위치에서 회전하기 때문에 뷰의 배치를 다시 계산해야 한다.
👉 이를 위해 CGRect를 사용하여 회전 후의 새로운 프레임을 계산한다.
extension View {
    func rotated(_ angle: Angle = .degrees(-90)) -> some View {
        Rotated(self, angle: angle)
    }
}
그리고 회전된 뷰의 크기를 반영할 Rotated 뷰를 만든다.
struct Rotated<Rotated: View>: View {
    var view: Rotated
    var angle: Angle

    init(_ view: Rotated, angle: Angle = .degrees(-90)) {
        self.view = view
        self.angle = angle
    }

    @State private var size: CGSize = .zero

    var body: some View {
        // 회전된 후의 새로운 프레임을 계산
        let newFrame = CGRect(origin: .zero, size: size)
            .offsetBy(dx: -size.width / 2, dy: -size.height / 2)
            .applying(.init(rotationAngle: CGFloat(angle.radians)))
            .integral

        return view
            .fixedSize()                    // ✅ 원래의 뷰 크기를 유지
            .captureSize(in: $size)         // ✅ 뷰의 크기를 측정하여 저장
            .rotationEffect(angle)          // ✅ 뷰를 회전
            .frame(width: newFrame.width,   // ✅ 회전된 후의 새로운 크기를 적용
                   height: newFrame.height)
    }
}
✅ 이제 View.rotated()를 사용하면 회전 후의 크기를 자동으로 반영하여 배치할 수 있다.
✅ VStack에서 정렬될 때 회전 후의 오프셋이 반영되므로, 정확한 위치에 배치 가능
4️⃣ RotatedTextView 구현
Text 뷰를 Rotated를 활용하여 자동으로 크기를 반영하는 RotatedTextView를 구현한다.
struct RotatedTextView: View {
    let text: String

    var body: some View {
        Text(text)
            .rotated() // ✅ 자동 크기 조정 및 정렬 반영
    }
}
✅ 이제 RotatedTextView를 사용하면 VStack 내부에서도 회전된 오프셋이 자동으로 조정되어 정렬된다.
📌 정리
📍 SwiftUI에서 Text를 회전할 때 발생하는 문제
- rotationEffect를 사용하면 뷰의 원래 위치를 기준으로 회전하기 때문에 VStack 내부에서 정렬이 깨질 수 있다.
- 회전 후의 크기가 반영되지 않으므로, 오프셋이 엉뚱한 위치에 배치될 수 있다.
📍 해결 방법
✅ PreferenceKey를 사용하여 뷰의 회전 전 크기를 측정
✅ CGRect 변환을 통해 회전 후의 크기를 계산
✅ .rotationEffect()를 사용한 후 새로운 크기로 frame()을 업데이트
📍 최종 적용 방법
✅ RotatedTextView를 사용하면, VStack 내부에서도 회전된 크기가 반영된 채로 올바르게 배치됨! 🚀
struct RotatedTextTestView: View {

    var body: some View {
        VStack() {
            Text("Horizontal text")
            RotatedTextView(text: "Vertical text")
        }
    }
}

https://stackoverflow.com/questions/58494193/swiftui-rotationeffect-framing-and-offsetting
'# 02 > Swift' 카테고리의 다른 글
| [Swift] 기초 입문 Study (0) | 2023.07.21 |
|---|---|
| [Swift] RxSwift (0) | 2023.01.11 |
| [Swift] DispatchQueue / Serial / Concurrent (0) | 2023.01.11 |
| [Swift] DFS/BFS (0) | 2022.12.18 |
| [Swift] MaxHeap (0) | 2022.12.12 |